
The Cosmicbow › How to play
How to play the Cosmicbow
You can play it after just a few minutes of getting to know it, even with no musical experience at all.
First steps
An accessible instrument
The Cosmicbow is so accessible that you can already play it after only a few minutes of getting the hang of it!
Even someone with no musical experience or knowledge can play it without any trouble; it can even be an advantage for a free, intuitive approach.
But be aware: accessible does not mean limited. It is an instrument that lasts, one you keep growing with, in a subtle balance between simplicity, complexity, fluidity and surrender.
So it is an instrument open to everyone, and you can never grow tired of it as long as you love exploring new spaces.
In practice
All the strings can be tuned with guitar tuning machines.
I most often use a thin wooden stick to strike the strings, but you can also pluck them or play with a pick, or with a bow… And plenty more to experiment with!
The vibration of each note travels through the wood.
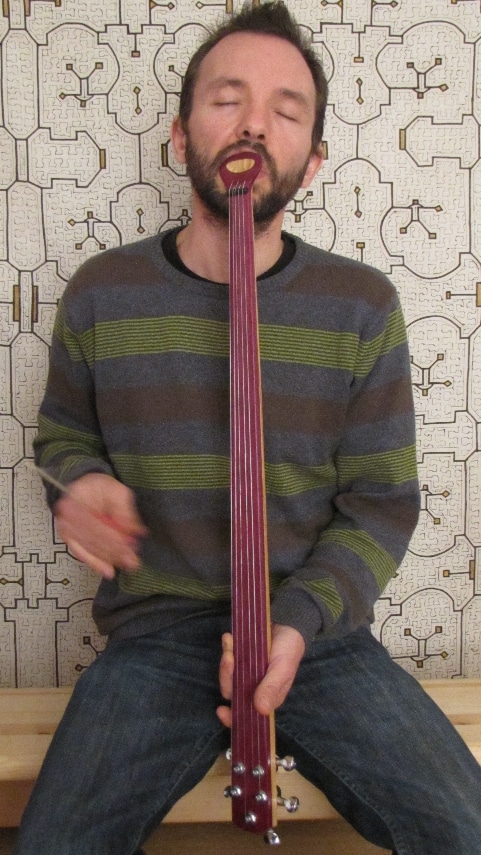
You then rest your lips on the thinner spoon, leaving a slight opening for the sound to escape on the left if you are right-handed, and on the right if you are left-handed (see the photos and video just below).
The lower and upper lips always stay in contact with the spoon.
There is no need to open your mouth wide; the sound will not be any louder. On the contrary, it would cause a leak, just as an oversized tap would reduce the pressure.
The side of the mouth is slightly open and lets the overtones escape.
The modulations then happen on several levels: breath, throat, tongue and lips, and everything that can move inside.
(same principle as the jaw harp, with more freedom of movement: bounces, movements of the lips and jaw).


Example for a 4-string
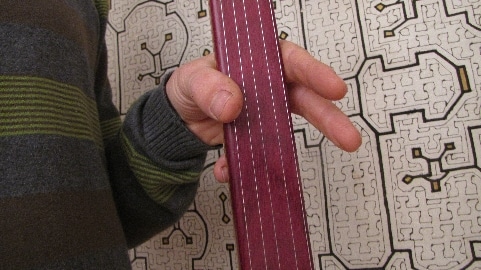
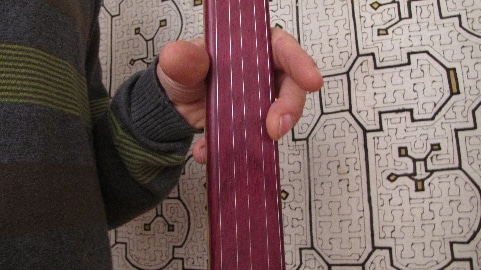
For example, on a 4-string I don’t let all 4 strings ring (even though all four are struck continuously), but only 3 (sometimes 2), the fourth being muted, either by the thumb for the left one, or by the middle finger (or index finger) for the right one (or the other way around if you hold the Cosmicbow with your thumb on the right or if you are left-handed).
I alternately mute the left string and the right string, which makes two chords, with the two middle strings ringing continuously.
It is this alternating movement that gives the sway, and takes us from a linear sound to rich, complete music that moves forward in a spiral…
For the other models
The same goes for the 5, 6, 7, 8 and 10-string instruments, except that on the 6, 7, 8 and 10-string ones I mute at least 2 strings (alternately) on each side, and for some chords, 3 on each side.
However, with certain tunings, on a 6-string it is possible to mute just one.
With the 5-string, you can mute just one (more cosmic), or two (in which case the melody will be clearer), but here again, it depends on the tuning.
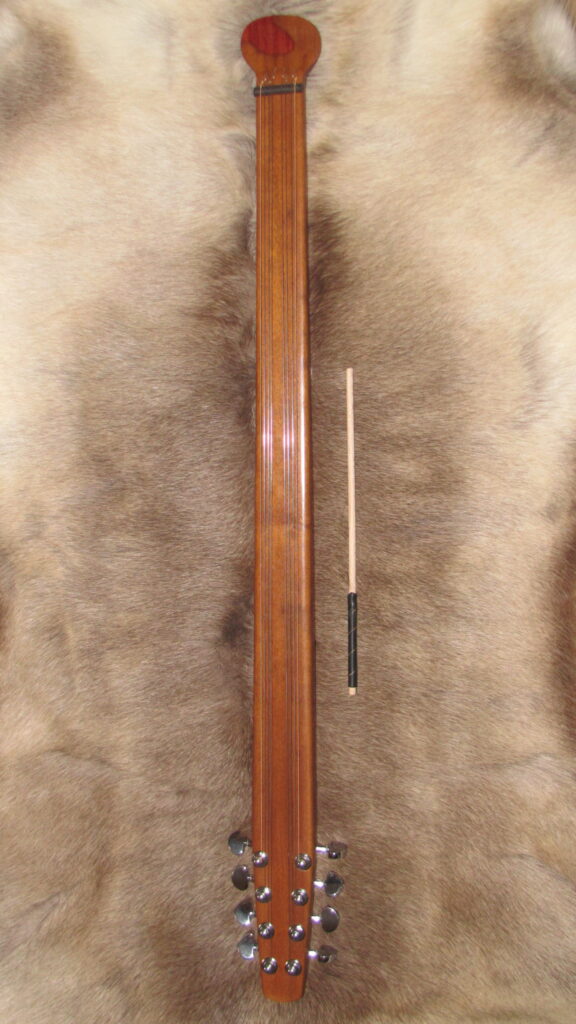

A great many possible tunings
Between the different rhythms, sequences and playing possibilities, there is, with four strings, a great number of possible tunings, each opening onto a different soundscape, so that with a single playing style, even a basic one, there is a lot to explore.
With the 5-string you go even further into the cosmic, and there are many wonderful tunings to discover there too!
And the 6-string is something else again, because you can play on two chords that have no note in common, which opens up a whole range of new combinations.
Each instrument is like a living being, meaning it has its own character, its own specific way of vibrating, so the choice of instrument will also steer you toward a certain style of playing.

Tuning
Dozens of tunings are possible, and each one carries us into new landscapes, sometimes gentle, joyful, melancholic, cosmic and so on…
Don’t neglect tuning before you play, because if the tuning is off, at best you won’t get very far, and at worst you’ll throw yourself completely off.
When you have found a beautiful tuning, it is a good idea to save it, either by writing it down (for those who read music or have a tuner) or by recording it note by note.
You may come across very beautiful tunings that don’t fit the grid of “written” music and are nonetheless harmonious, which is why I encourage people to trust their ear, their sense of harmony. Paradoxically, this offers a great deal of space and freedom, safely out of reach of knowledge, which is always confined to the realm of the known…
Can we really approach the unknown by relying on the known?
If the sound isn’t right, it is either because the strings are too tight or too slack, or because the instrument is out of tune.
For a simple, intuitive approach
- Choose the first note on the low left string (by feel, or however you like), then adjust the next one until it sounds good with the first.
- To fine-tune, strike these 2 strings at the same time (without letting the others ring). Everyone has a sense of harmony, of what is beautiful and right… If you can hear when it is dissonant, you can hear when it isn’t, and that is the ear. That is what you must follow…follow your ear and your heart, and let go of everything else to become pure listening.
- Once the first 2 strings are tuned, do the same with the third, then the fourth. Along the way you may need to readjust the tension of a string, since the instrument may have shifted slightly under the tension of the last strings.
- Once all four strings are tuned, check that the low right string works with the 2 high strings by striking them together while keeping the low left string from ringing (by resting a finger on it), then let the low left string ring with the 2 high strings while blocking the low right string (reverse this if you are left-handed). Use this alternating movement to check that the two 3-string chords (or more, depending on the instrument) work together…
- For a 5-string, same principle, with one extra string in the middle
All set? Then off you go!
Shaping the overtones
The instrument’s strings replace our vocal cords, which are at rest while we play.
There is a whole range of high overtones (tongue) and low ones (throat), of effects and modulations that can be made alternately and/or simultaneously.
The simple act of speaking involves complex movements inside the mouth…
Throat sounds, tongue clicks against the palate, and so on, and so on…including breath control, used to draw in syllables or to project letters or words with force… and so many other subtle variations carried out within a single sentence…
We do it naturally, without thinking, with complete fluidity…
Simply speaking already involves great mastery of sound, so the idea that we don’t know how is false.
We can explore overtones with our mastery of speech; it is another “language”, and we all already have a high level of practice when it comes to the movements, modulations and variations of the mouth.
Knowing this, we can drop false ideas, since they can block the sound (as long as we believe them).
It is both instinctive and intuitive; as long as the instrument is well tuned, it comes naturally!
Letting the sound flow is as natural as breathing.
You can aim precisely and return to a specific overtone without having to “think” about it, just as you speak in a certain tone to express a feeling without planning it in advance.
The Cosmicbow is an instrument of spontaneity as much as precision!
To me, what matters above all is to follow the melody, the heart, the guiding thread of the music; effects serve the melody, not the other way around.
If you follow the melody, the melodies, you don’t get lost.
The Cosmicbow is an instrument of spontaneity as much as precision!
Holding the instrument
Getting to know the instrument
The Cosmicbow with harmonic spoon is held vertically, not horizontally like the classic; the vibrations are picked up at the spoon…
and it has a leather handle so you can carry it without thinking about it.
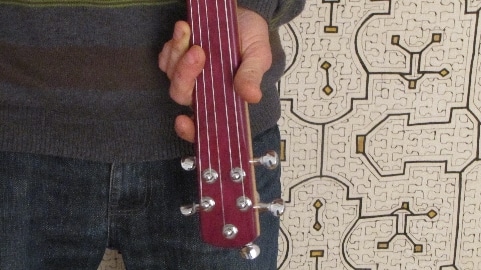
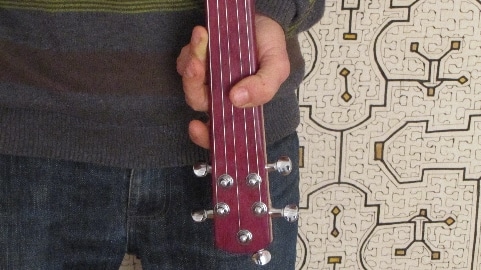
Playing with the left hand (or right hand if you are left-handed):
You touch the string to keep it from ringing; there’s no need to press on it, a light touch is enough.
Then you release the string and press the one at the other end.
The handle
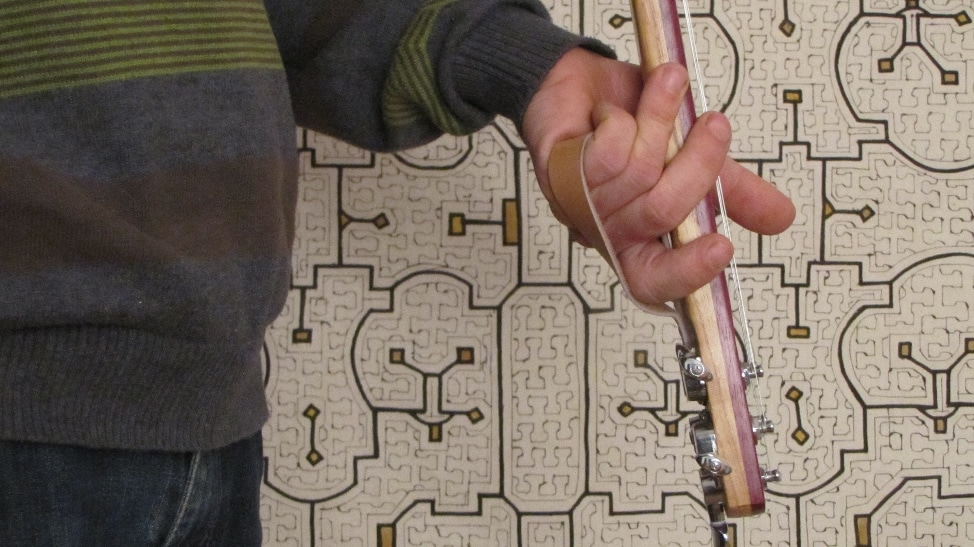
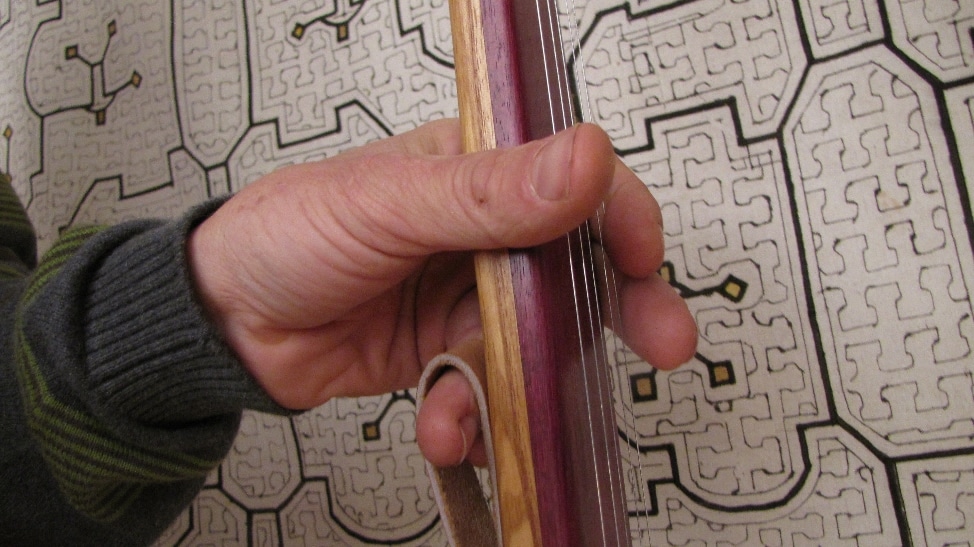
For a 4-string, for example, hand position to mute a string:
While the thumb touches one of the low strings to keep it from ringing, you play the 3 (or more on a 5 or 6-string)
other strings, which together form a chord. Then you lift the thumb, which frees the muted string, and at the same moment you touch the other low string with the middle or index finger, which takes you to another 3-note chord (or more, depending on the number of strings on the instrument).
The two high strings ring constantly, which creates a link between the two chords.
This alternating movement can be played in every possible way.
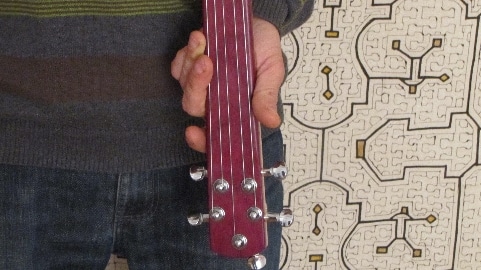
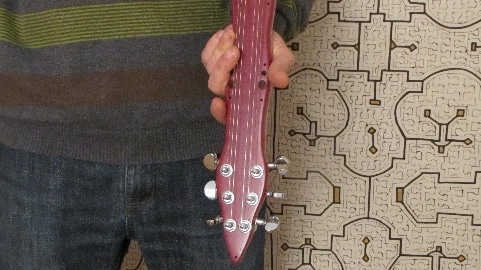
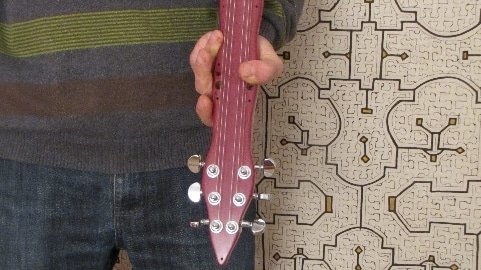
The same thing, but this time muting two strings at once:
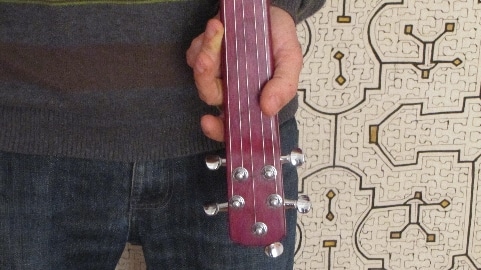
And with a 6-string (likewise for 7 and 8 strings), you mute at least 2 strings, sometimes 3:
And for those who don’t find this hand position comfortable, you can also reverse it, meaning the thumb points inward instead of outward:
Mouth position
The lower and upper lips stay in constant contact with the spoon, while the side opens slightly to let the overtones escape.
Let your body find its best position, as well as the best spot to catch the overtones.
As for rhythm, you can start by striking the strings like a metronome.
A simple, steady movement helps you focus better on the overtones and the melody.
Even if you only let three strings ring at a time (or two), you must always strike all the strings.
Later on, all kinds of rhythms become possible, and they can be enriched by bouncing the stick on the strings, which you get by pressing the stick down lightly and then letting it bounce off the strings.
How does it work?
A short demo with a 6-string:
Another short demo with a 4-string:
As for the so-called “classic” model, it works the same way, except that it has no spoon and is held horizontally rather than vertically, with the mouth placed just past where the strings begin:


Care
Even after 20 years of drying, wood keeps living and moving with changes in temperature and humidity.
Take care to keep the instrument (as far as possible) in the most stable environment you can.
Avoid leaving it near a heat source, such as a fireplace, a radiator, or in a car in the sun…
Note that what makes wood move is above all dry air, which, combined with heat, causes it to shrink.
So a very slight humidity in the air is beneficial, but it is better to avoid heavy moisture like morning dew (for those who like sleeping out in nature; in that case, put it in a case)…
That said, I once soaked one, fully submerged even, in a waterfall for several minutes, and it’s doing just fine!
The instrument is treated with an oil and natural resin varnish that I make myself, and I add Tulsi (Holy Basil) essential oil to all my varnishes, because it is a very beneficial and luminous plant that I am very fond of. This natural varnish penetrates the wood fiber and forms a waterproof yet breathable layer, which greatly softens swings in humidity and temperature while still letting you feel the wood. When you are not playing it, it is best kept in its case or, failing that, wrapped in a thick cloth.
Do not overtighten the bow. You need to feel the ideal tension that makes it sound its best.
Some sound best in the low register, others in the mid or high.
But overtightening would weaken the strings (and the resonance), especially the low ones, whose core is thinner and which need some flexibility to withstand the strikes of the stick (depending on the stick’s weight).
You can apply organic food-grade linseed oil (beware of linseed oil sold in hardware stores, as it sometimes contains lead!)
to the mouthpiece from time to time, just a tiny amount with your finger, then wipe off the excess with a cloth and let it dry, or “cure” (hardening through oxidation). This will help keep the varnish on the mouthpiece from wearing away.
Better still, you can melt some beeswax and mix in a little linseed oil to make a soft wax balm (in this case too, apply a thin layer and wipe it off really well)
be careful with linseed oil: a cloth soaked in it can sometimes catch fire through oxidation, so to avoid that, it is best to put the cloth in a closed glass jar afterward.
When the strings get too old, the sound turns dull (especially wound strings). Don’t hesitate to change them when that happens, and with new strings the sound will shine again.
Changing the strings
String references are provided with the instrument.
It’s very simple!
Just remove the old string and fit the new one the same way.
Guitar strings have a small ball end (the one that sits in the hole at the mouthpiece). Thread the string, then pass the other end through the hole in the tuning machine. Before winding it, be sure to leave some slack (you should be able to pull the string about 10 cm away from the neck) so you can wrap it several times around the tuning machine post.
From there you can start turning the tuning machine until you reach the right tension.
Make sure the strings are all at the same height.
If you change all 4 strings at once, which is unlikely, be careful not to lose the small piece(s) of wood that raise the strings (nut/bridge), and put them back exactly as they were, because they play an essential role in the sound of the bow.
Generally, if you change all the strings, you leave one on and fit the first new one, then remove the old string; that way there is always one holding the nut in place…
If you choose other string gauges, you may end up with a buzzing, tinny sound, or even damage the instrument.
Watch your eyes when tightening or loosening the strings (that is sometimes when they snap); keep a safe distance, you never know…
I advise you to always keep spare strings, just to have some ammunition… just in case… On a Sunday… Or up in the mountains…
No instrument yet?
If you are just starting out, the 4-string is a good place to begin.